American Cut Glass Association (ACGA) - Jim Havens' "Guide to American Brilliant Cut Glass"
Introduction to Cut and Engraved Glass
The Four Stages in the Production of a Cut-Glass Article
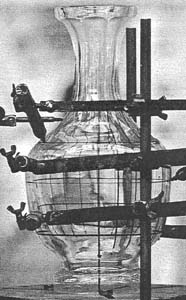 It is convenient to divide the production of a cut-glass article into the following sequence of four steps or stages: The first stage involves marking (i.e., drawing) the major features of the pattern to be cut onto a plain (i.e., smooth) blank. On the right is an instrument that does this marking at the modern Waterford (Ireland) glasshouse (Grehan 1981, p. 73). The blank itself is formed either by blowing "freely" -- that is, by using only hand tools -- or, as in the Waterford example, through the use of iron or paste molds. Molds are used to produce complex shapes and to standardize sizes. The blank can also be made by the process of pressing, where both mold and plunger are smooth (i.e., not patterned).
Using large iron, steel, or carborundum wheels fed with sand and water -- a grit that actually cuts into the glass blank -- the rougher cuts the major features of the pattern, guided by the drawn design. The wheels' edges are either flat, convex, or V-shape in profile, each producing a distinctive cut. This roughing is the second stage in the production process. The roughed-in blank is then passed to the smoother for the third stage. The smoothing stage involves the use of a variety of limestone wheels with edge profiles that are dressed to match those of the cutting wheels. The stone wheels are kept wet by a water drip that prevents heating of the glass blank. In this manner the major cuts made by the rougher are completed, smoothed, and details that do not require use of the large cutting wheels are added. At this point all of the cuts, although smooth to the touch, show an unpolished greyness.
Polishing of the smoothed cuts is necessary in order to remove the greyness and restore brilliance to the glass. This polishing stage is the fourth and final stage in the making of a cut-glass article, and it can be time-consuming. As a result, by 1905 most manufacturers were using chemical (i.e., acid) polishing in place of mechanical (hand) polishing to speed the process. This saved time, and when done properly did not harm the glass. Many collectors, however, prefer the appearance of cut glass that was produced prior to the advent of chemical polishing. (For more information on the polishing stage see the Polishing file.)
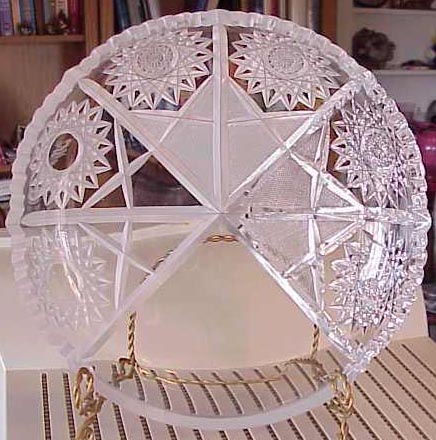
The following incomplete "demonstration" nappy, or shallow bowl, illustrates the results of roughing (left two segments), smoothing (center two segments), and polishing (right two segments). Marking is not shown but would occupy the bottom double-segment if the demonstration nappy were complete. Notice the uncut (smooth) rim in this area. At the next stage (clockwise) the rougher has cut radial meters, Xs, and 16-pt hobstars. Then the smoother takes over, smoothing the rougher's cuts and adding Brunswick stars to the hobstars' hobnails and cutting areas of strawberry (fine) diamonds. The mechanical polishing of all cuts at the final stage restores the glass's original brilliance (Image: Internet). Such items appear on the market more frequently than what one would expect, but they are, nevertheless, considered scarce, if not rare.
Updated 18 Feb 2003